http://www.williams-sonom…cake&cm_src=SCH
I bought this very cute Build-a-Bear cake pan from Williams-Sonoma that allows you to bake a cake in the shape teddy bear sitting up. The bear is in two parts and you use frosting to “glue” the two pieces together.
I cheated a bit and used Devil’s Food cake mix instead of making my own cake but I did make my own butter and cream cheese frosting.
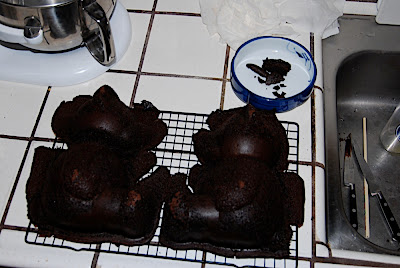
Here are the two sides cooling on a wire rack.
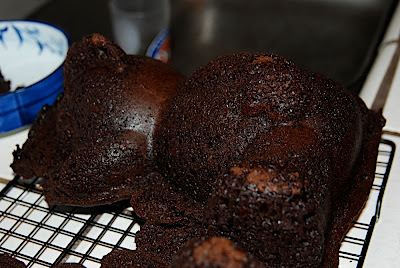
I think next time I’ll try the cake recipe on the back of the box. The mix out of the box doesn’t seem to be dense enough so the cake is a bit “floppy”.
I baked the cake itself on Wednesday and let it cool overnight and attempted to frost it on tonight prior to our holiday potluck tomorrow afternoon. Well it turned out to be quite a disaster as the frosting wouldn’t harden so the two sides wouldn’t stick well together. I tried to salvage it by putting the frosting on the bear but my frosting wouldn’t spread well so my attempt of using it to seal the bear from the outside failed… so sad.
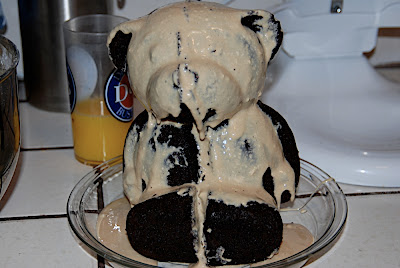
So now this poor bear will be our breakfast and snack for the next few days…
Original recipe from the box (the one to use!!)
For the cake:
1 cups (470g) all-purpose flour
2 tsp baking power
1 1/2 tsp salt
16 Tbsp (2 sticks/250g) unsalted butter
2 cups (500g) granulated sugar
4 eggs, lightly beaten
1 1/3 cups (340ml) milk
1 1/2 tsp vanilla extract
For the buttercream:
4 Tbsp (1/2 stick/60g) unsalted butter
1 1/2 cups (185g) confectioners’ sugar, sifted
1 Tbsp milk
1/2 tsp vanilla extract
Pinch of salt
Have all ingredients at room temperature.
Position a rack in the lower third of an oven and preheat to 325F (165C). Grease and flour the wells of the Build-A-Bear Workshop Cake Pan. To ensure easy release and excellent definition of the pattern, flour the pan with Wondra flour, a fine flour typically used to thicken gravy. Tap out excess flour.
To make the cake, over a sheet of waxed paper, sift together the flour, baking powder and salt; set aside.
In the bowl of an electric mixer fitted with the flat beater, beat the butter on medium speed until creamy and smooth, about 30 seconds. Add the granulated sugar and continue beating until light and fluffy, about 5 minutes, stopping the mixer occasionally to scrape down the sides of the bowl. Add the eggs a little at a time, beating well after each addition.
In a small bowl, combine the milk and vanilla. Reduce the speed to low and add the flour mixture in three additions, alternating with the milk mixture and beginning and ending with the flour. Beat each addition until just incorporated, stopping the mixer occasionally to scrape down the sides of the bowl.
Spoon the batter into the prepared wells, dividing evenly. Spread the batter into the head, nose and tail areas and up the sides of the pan so the sides are higher than the center. Bake until the cake begins to pull away from the sides of the pan and a toothpick inserted into the center comes out clean, 45 to 55 minutes.
Transfer the pan to a wire rack and let the cake cool in the pan for 15 minutes. Tap the cake pan gently on a work surface to loosen the cake. Set the rack over the cake, invert the pan onto the rack and lift off the pan. Let the cake cool completely, at least 2 hours, before assembling and decorating.
Meanwhile, make the buttercream: In a small bowl, using a handheld mixer, beat the butter on medium speed until smooth and creamy, about 1 minute. Add the confectioners’ sugar, milk, vanilla and salt and continue beating until light and fluffy, 2 to 3 minutes more.
To assemble the bear cake, return both halves of the cooled cake to the pan. (This is easily done by placing the pan over the cake halves and inverting the rack onto the pan.) Level the cake by using a serrated knife to gently saw off the part of each cake half that rose above the edge of the pan. Then remove one cake half from the pan.
Spread a thin layer of buttercream, about 1/2 cup (125ml), over the cut side of the cake half that is still in the pan. Place the other cake half, cut side down, on top of the buttercream and gently press down to secure the two halves. Cover the cake loosely with plastic wrap and refrigerate until the buttercream is firm, about 30 minutes.
In the center of a serving plate, place a mound of buttercream half the size of the bear cake’s base. Remove the cake from the pan by lifting the pan vertically and tilting it forward, then catching the cake with your hand. Place the cake upright on the plate, on top of the buttercream. Decorate the cake as desired. Serves 16.
Creating Fur Texture on the bear:
To give the bear a decorative fur finish, brush the cake with a sugaring glaze, then sprinkle with coarse sugar. Alternatively, pipe chocolate buttercream frosting onto the bear. Directions for both techniques follow.
Sugaring glaze:
1 cup (125g) confectioners’ sugar
1 tsp cocoa powder or a few drops of brown food coloring
2 Tbsp milk
1 cup (200g) turbinado or demerara sugar
In a small bowl, whisk together the confectioners’ sugar and cocoa powder. Slowly pour in the milk, whisking constantly until the glaze is smooth. Apply a small amount of the glaze on the bear to test is the glaze matches the color of the cake; add more cocoa powder if needed to darken the color. Cover the bowl tightly with plastic wrap until ready to use.
Place the assembled bear on a clean baking sheet. Place 2 pieces of parchment or waxed paper underneath the bear, one on each side, so you can easily remove the paper after decorating.
Using a small paintbrush, brush a thin layer of the sugaring glaze over the face, ears and back of the head. Sprinkle some of the turbinado sugar over all of the glazed areas; in some places, you may need to press in the sugar with your hand. Repeat the process with the torso, arms, legs, feet and tail. Collect excess sugar from the parchment paper and reuse if needed. Let the glaze set before cutting the cake.
Quick chocolate buttercream frosting:
Prepare a batch of Quick chocolate buttercream frosting; you’ll find the recipe at williams-sonoma.com/recipe.
Fit a pastry bag with a small star tip and fill the bag with chocolate buttercream frosting. Starting with the head, pipe “fur” in vertical rows using 1/4 inch (6mm) strokes. Repeat the process on the torso, arms, legs, feet and tail.